This customer story comes to us from Tabitha.
“Hello! I’m new to this so let me start off by telling you a little bit about myself: I’m a proud military wife and stay-at-home mom to four beautiful kids. I have a passion for “remodeling” second hand toys; you could say I’m an overgrown kid myself :-).
In my many years of being a stay-at-home mom, I have found that my “me time” has become a time that I find toys and fix them up. It gives me a chance to decompress and make something my children and their friends can enjoy, a win-win so to speak! I shop at local thrift stores, Facebook yard sale sites, and even the curb on trash day to find my treasures. I bring them home, clean them up, and begin to “remodel” them.
Step2 products are like gold for me; durable, long-lasting, and cheap to get parts for. The products are so well made, they are easiest and funnest ones for me to redo. Plus, an added bonus is getting to talk to the wonderfully helpful customer service professionals. (Ms. Sandy and Ms. Beth are AMAZING!)
So, let me tell you how I give these products a second life; it’s so easy you might want to get started on one right away!
STEP 1: Wash and clean the product thoroughly. The cleaner the surface, the easier it is to take off broken, peeling, or unwanted pieces. I recommend Dawn dish soap and a soft Brillo Pad.
STEP 2: Make a list of any and all missing pieces, as well as the product you’re fixing up, and have it handy when calling Step2 to order parts. The representatives can help you get the parts and like I wrote above, Step2 parts are extremely affordable. Don’t be alarmed if they don’t carry the little parts; I.E. stickers, this gives you and opportunity to make it your own!
STEP 3: This is when the fun begins! Google or draw up ideas for what you want the toy to look like and what it would be best used for. Have a theme or color scheme in mind. I personally have found that replacing any broken or missing dry erase boards with a piece of wood and chalkboard paint is best suited for my children. (And most local hardware stores will cut the wood for you!) Also, ribbon seems to work better for us, rather than stickers. They are a little more durable and easier to clean without peeling or tearing.
STEP 4: Measure, cut, and place all the pieces in their spots. Make sure everything fits the way you want, before continuing on.
STEP 5: Glue and/or screw all the parts into place. (A hot glue gun works wonders on holding ribbon in place. Just a dot, not a lot of glue.)
Lastly, I have attached a few pictures of my projects.
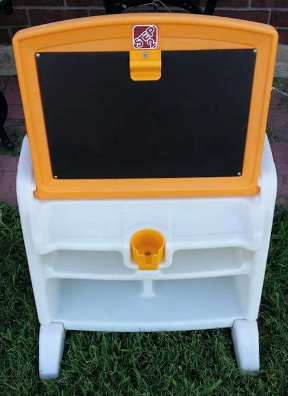
DESK: I found on the curb. Spent $4 on a thin piece of wood and then painted it with chalkboard paint. I ended up giving it to a soldier’s little girl, and to this day her mom still tells me how greatful they were to receive it and how she loves it.
Total Cost: $4 (not including the chalkboard paint I already had.)
Total Time: 2 days

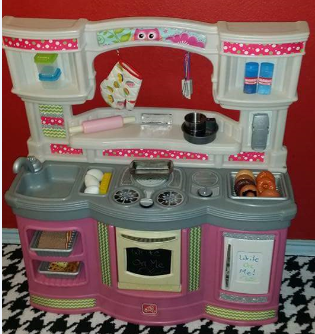
OWL KITCHEN: I found at a thrift store for $5. Spent $5 on ribbon, $3 on dry erase tape, $2 on glitter tape, and $21 (shipping and all) on replacement parts from Step2 (that included all three baskets, stove eye, pots, pans, coffee pot, utensils, and phone).
Total Cost: $36
Total Time: 4 days

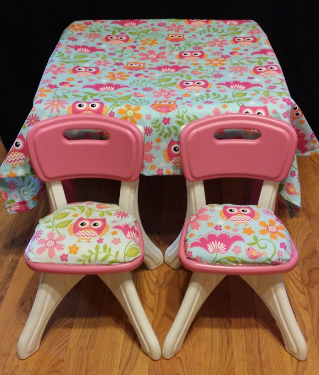
OWL TABLE & CHAIR SET: $5 Flea Market find and $5 for fabric! (It and the kitchen were a special project for my friend’s first daughter.)
Total Cost: $10
Total Time: 3 days

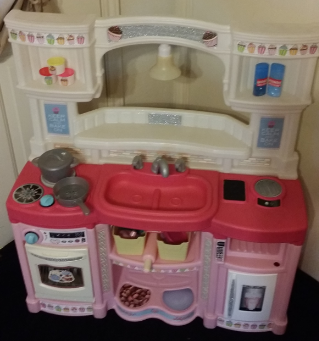
CUPCAKE KITCHEN: I found it on the curb. Spent $3 on ribbon, used the left over glitter tape from previous projects, $2 on cupcake stickers, $3 on chalkboard tape, and $26 on replacement parts (that included two baskets, 9 piece cupcake set, microwave door (hasn’t arrived yet, so not pictured)), and light with hook!
Total Cost: $34
Total Time: 3 days and still in progress”

The Step2 Company LLC does not promote or condone the alterations of Step2 products. This blog was solely written for the purpose to show the creativity of our customers. If you choose to alter the appearance of your Step2 product, it will void the warranty.